Just when we thought it was safe to go outside and replace the roof panels from the last storm, in comes Storm Doris and whips off another one! My partner had thought that when he had replaced the panel lost from Storm Angus he had tightens down the hatches on the rest of the roof. Unfortunately we weren’t expecting such strong winds, and once again it ripped off one of the roof panels from the chicken enclosure. Instead of taking the whole panel clean off, this time it snapped at an angle so it will take a bit more time to take off and repair.
Storm Doris damage
After the wind died down the next day, I thought it would be a nice treat for the chooks to have the run of the garden. They loved scratching through the wood chip and grass to find all the tasty bugs bought to the surface by the rain. This meant that Smudge dog had to stay in but she was desperate to be out and playing with her friends.
Mummy, I want to go out and play!
Despite the storm, the weather has been improving and getting warmer. With the girls being over their moult as well, egg production has started back up. I tried using them up in last weeks recipe for Chocolate Mousse but I can’t stay on top of how many we’re getting in. Going to have to start selling them again!
Eggs Galore!
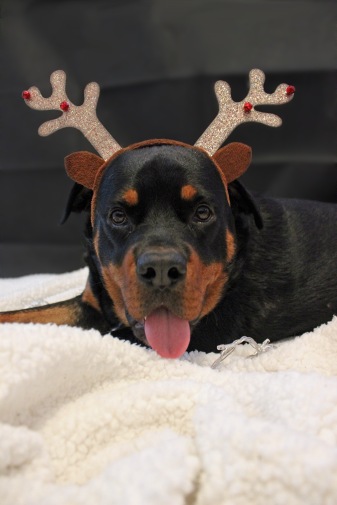
Speaking of moulting, a certain Smudge dog has started shedding her winter fur. We popped into the pet shop today to grab her a brush to help with the loose fur (and where she got fussed over by everyone). She also got a bone or two to distract her whilst I brushed her as I wasn’t sure how she would react to brushing but she seemed to be pretty chilled about it. Good thing as it looks like she really needed it from the amount I got off of her.
It’s been another busy, blustery week. Hopefully that’s the last of the bad weather for the year and we can get on with being happy, content chickens 🙂
After a hectic couple of months it’s great to finally get back to blogging. I have a few bits to report from over the Christmas period:
If you remember we lost a roof panel over after a huge windy storm. Over Christmas we finally had some time to replace it and get the enclosure watertight again. To hold some of the muddy floor together from the rain that had come through when the roof came off, we put some wood chip down on the floor. The girls have really enjoyed scratching around in the wood chip and not sinking into mud.
With it being Christmas, it was only fair that that the animals got a taste of the festive season. Smudge got her own advent calendar which she soon learnt meant getting an extra treat with breakfast. The chickens got some sprouts on a string which was hung up in their enclosure to give them a different way to eat their greens.
For Christmas, my boyfriend and I, unbeknown to each other, bought each other chicken related gifts. We both got each other egg storage, I got him a wire chicken basket and he got me wooden box. The only awkward thing now is that the chooks have packed up production for the winter due to moulting and it being very cold.
With the cold comes the snow! The chickens have already seen some snow in their lifetime but for Smudge puppy this is the first time she has seen snow. We woke up on 13th Jan to a pathetic amount of snow, but snow on the ground nonetheless. She seemed to enjoy it but I think if we had more she would be able to make more of it. Today we had a lot of flurries and we got caught in them on our walk. She seemed to enjoy chasing and eating the flakes bless her!
Hopefully I’ll be able to be a bit more regular with my blog rather than catching up on two months worth of activities in one post! For now I shall leave you with a very merry Smudge puppy:
Last night was a bit windy apparently. As the girls were snuggling down to sleep, the extreme winds of storm Angus managed to catch under one of the roof panels and took it off! We woke to a soggy enclosure and a rather unhappy flock that look like they’ve been to the land of Oz and back.
Just another thing to repair when this storm passes…
As well as the roof panel, the wind blew our garden furniture around the garden and a plastic box that normally holds Smudges toys got smashed up.
Storm Angus has hit The UK hard, with our enclosure being one of the many casualties. Everyone stay safe in this weather and let’s hope it blows over soon.
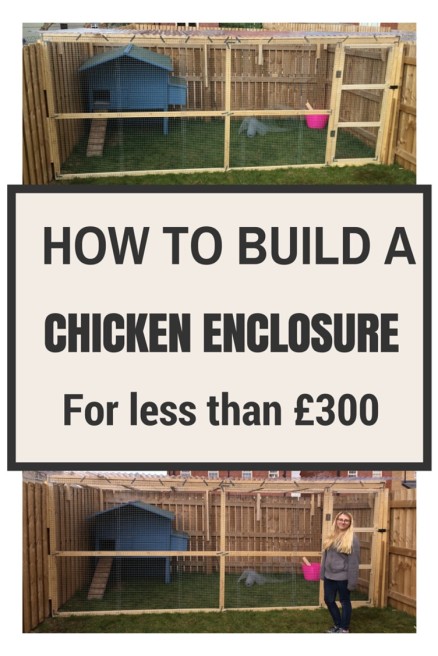
After a little bit more work the enclosure is now chicken ready! All the wire is on the front, the padlock is on the door and the coop is repaired. Now all we need is the chickens, which should be with us on Tuesday afternoon! In the meantime, if you’re thinking about getting chickens or just want to update your coop and give the chucks a little protected space, here’s how we made our chicken enclosure.
For the coop, we saved one that had been broken by a storm and was just about to be burnt. We cleaned it up, painted it a nice blue and put it back together. We were lucky to get a second hand coop which didn’t really need too much fixing, so we didn’t need to fork out too much for it, just £20 for the Cuprinol Forget-me-not blue paint.
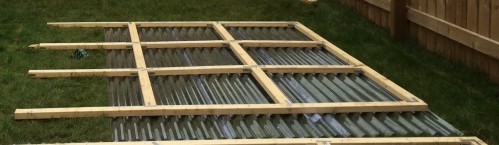
Next we started building the enclosure. We bought 30 pieces of 2.4m long timber (10cm wide X 5cm thick) from B&Q for £70, which has a good deal on at the moment if you buy more than 20 pieces, it brings the price down to £2 each! The roof was a rectangle 2.4m X 4.8m (the 4.8m was made of two pieces of wood fixed together). The rectangle was then split into 18 smaller 0.77m X 0.7m rectangles to give the roof strength so that it could be freestanding other than being attached to the garden fences.
A half section of the roof. It was easier to lift on in halves
All the wood was held together with metal plates and angles. Straight metal plates were used either side of a joint and metal angles were screwed into every inside corner. This added some real needed strength, which without would have caused the roof to cave in from its own weight.
On to the roof structure, 9 plastic roof sheets were screwed down. These were 3m long by 0.5m wide and £8 each from Wickes. The plastic sheets should help keep the rain off and stop the enclosure from becoming a mud bath.
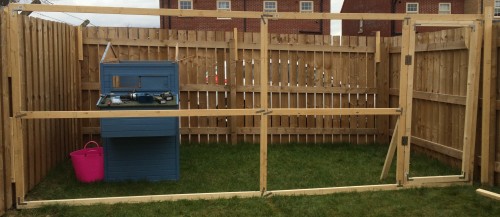
The front of the enclosure was made in a similar way as the roof, with a large a large outer frame (4.8m X 1.9m) split into 5 sections, 4 supporting (2 sections of 2.27m X 0.95m and 2 of 1.47m X 0.95) and one for the door of 1.7m X 0.78. We used the timber to make the door as well. All joints and inside corners were supported by metal plates and angles as describe for the roof.
We had to remember to put the coop inside before putting up the front as we would not be able to to get it through afterwards
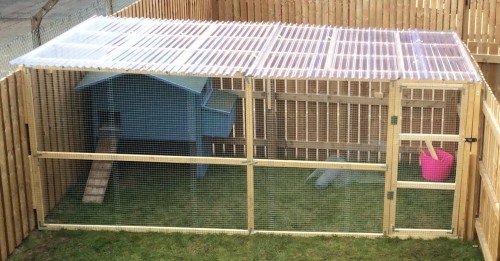
Once the front had been secured to the fences, the roof was lifted on and secured to the front and all of the fences. As the fence panels were not very wide, we added some extra supports along the fence where we could attach the roof onto with more metal angles. The extra supports at the back were longer than the front so that the water drained off into our garden, not the drive behind the garden. In the future, we’re planing to build a raised plant bed to catch the water and stop the ground from soaking through.
After being strapped down to stop the roof from taking off in the wind, we attached aviary mesh using metal staples to the front. The mesh was £35 for 3ft wide x 15m long, the wire was 1.6mm in diameter and in 1 x 1in squares. It was easily cut into the right sized striped using wire cutters. I can really recommend the online supplier that we got our mesh from hillsofdevon.co.uk as their website was really easy to use and understand and the wire arrived well before the estimated time of arrival.
Just the door to finish
I’m so happy with the finished product. I know a lot of the time I say that “we did this” and “we did that” but mostly it was my boyfriend that did all the construction work. He did a wonderful job and did most of the work with just an electric drill and a hammer, couldn’t have been a simple job once he got to grips with the design.
Nearly Ready…
Including the price of all the screws used and metal joining plates, which came to £107 from Wickes and our local DIY store (where we got more for our money) the total price for the enclosure came to £284 pounds. For how much work you have to put in and how few DIY skills are needed, the results look fantastic! There’s still a little bit to go like making sure that it’s also rat proof and painting the wood to make it weather proof but these can be done whilst we have the chickens.
With the enclosure ready, the next post will be when we actually have the chickens. Tuesday is the day, so expected lots of photos and happy thoughts! 🙂
After weeks of plan changes, windy weather and multiple trips to the DIY store, the chicken enclosure is finally up! And looking rather damn fabulous if I do say so myself!
Before wire and finished roof
Nearly Ready…
Just the door to finish
There’s still a few bits left to do; some wire to put on the door of the enclosure and fixing the coop after the wind blew the roof off, but the main bulk of the construction is done. I’ll do a whole post in the future on how we built it but for now I’m just going to hype up how close we are to getting chickens.
If all goes well we should be off to pick our chickens up next Tuesday!!! I’m so excited now, it’s finally happening, by this time next week there will be chickens in the garden. Whilst the day can be filled with finishing the enclosure, the evening will now be filled with researching chicken breeds. We’ve been told about a few breeds but always open to suggestions, so as first time keepers what would people recommend?
Can’t wait for the chickens now, keep watching for their arrival very soon!!!


 For the coop, we saved one that had been broken by a storm and was just about to be burnt. We cleaned it up, painted it a nice blue and put it back together. We were lucky to get a second hand coop which didn’t really need too much fixing, so we didn’t need to fork out too much for it, just £20 for the Cuprinol Forget-me-not blue paint.